What are tolerances?
Tolerance is the accepted permissible deviation in length or thickness, which is a very important term in the buying and selling of
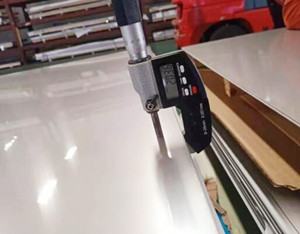
stainless steel plate and sheet as well as in the application process. The actual thickness of the stainless steel plate rolled by the steel plant is often less than the theoretical thickness. For example, the actual thickness of the theoretical 5mm plate is only 4.824mm, which is the tolerance.
In any case, there must be an error between the measured value and the true value (real value). However, it is important to clearly define the tolerable error range. In the field of measurement, the difference between the maximum size and the minimum size of the tolerable error is called “tolerance” or “tolerance”. In addition, the range of error recognized by law, such as industrial specifications, is also called tolerance.
In the actual drawing, if 「60(+0.045 -0.000)」 is recorded, it means that the reference dimension is 60 and 「+0.045 -0.000」 is the tolerance of the upper and lower limits. Therefore, the upper limit is 60.045 and the lower limit is 60.000.
In practice, one of the reasons for setting tolerances is to strike a balance between accuracy and machining costs. This is because if the accuracy is to be increased, the cost will also be relatively higher. It is important to design individual tolerances with individual parts to achieve a balance between quality and cost.
Why do stainless steel plates have tolerances?
During the rolling process of steel mill machinery, the roll is slightly deformed due to heating, resulting in the thickness deviation of the rolled stainless steel plate, which is generally thick in the middle and thin on both sides.
Positive and negative tolerances
When it comes to tolerances in China, most of them often refer to negative tolerances. Of course, there must be positive tolerances, but they are relatively few. Stainless steel plates with negative tolerance are mostly sold in the form of theoretical calculation, while stainless steel plates with positive tolerance are mostly sold in the form of weighing.
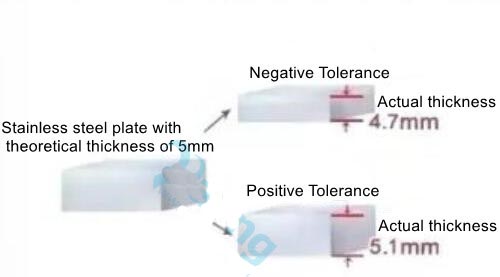
Tolerance exists between positive and negative tolerance, as shown in the figure, for example, 5mm is greater than 5mm is positive tolerance, and vice versa is negative tolerance.
Large and small tolerances
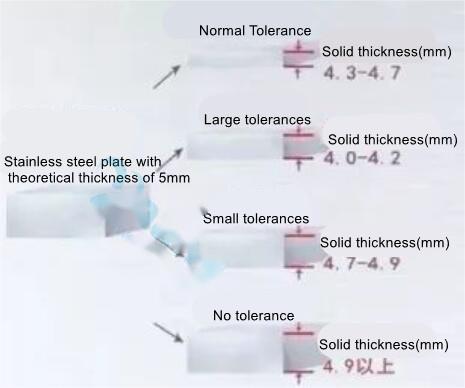
Tolerances also have a size, for example, the thickness of 5mm:
- 4.3-4.7mm for normal tolerances.
- 4.0-4.2mm for large tolerance.
- 4.7-4.9mm for small tolerance.
Is it possible to manufacture a product with zero error?
Suppose a square cube with a side length of 20cm is produced today. Although the designer’s desired size is 20cm, the actual production will definitely have errors, and the side length produced may be 20.02cm, 19.88cm, etc. Since processing errors cannot be avoided, the next question to be considered is what error range for the side length of the cube will not affect the quality of the final product. After examining various factors, we finally decided on a margin of error for the edge length of the square cube, and this margin of error is the tolerance.
Therefore, the so-called tolerance is the tolerance range of a specific size, the following is to introduce to you 3 common types of tolerance.
Classification of tolerances
Tolerances of geometric parameters include dimensional tolerances, shape tolerances, position tolerances, etc.
3 types of tolerances that you should not know
Dimensional tolerance
The first kind of tolerance is called dimensional tolerance, as the name suggests, is used to indicate the error range of a specific dimension, usually expressed in numerical values. Therefore, it is a symmetric tolerance.
Special attention should be paid to the number of decimal places after the tolerance and the manufacturing accuracy of the part. In Figure 1 (b), for example, if we want to check the length of the finished part, we have to use an instrument with accuracy to two decimal places because the number of decimal places after the tolerance is one, and the number of decimal places in Figure 1 (c) is two, so the testing accuracy must be three decimal places. Therefore, the design needs to evaluate the required accuracy of the part and use it to determine the number of tolerance places.
Fig.1 Example of dimensional tolerances
Geometric tolerance
The second type of tolerance is geometric tolerance, which is related to the shape of the part itself and is used to determine the geometry. To understand geometric tolerances, let’s consider a question: If we want to make sure that a shaft part is straight and not bent, how should we mark the tolerance range?
Figure.2 Dimensional tolerances cannot be marked to ensure that the shaft is straight
As you can see from Figure 2, although the dimensional tolerances can guarantee the tolerance range of the diameter of the shaft, they are measured by measuring the distance between two points, so the situation in Figure 2(b) can occur, where the shaft can be bent even though the dimensional tolerance range is met.
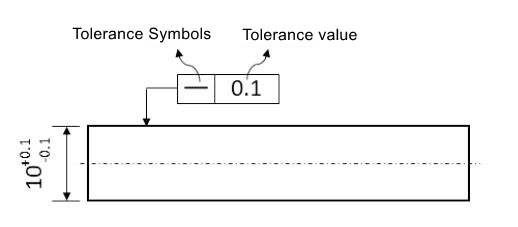
In order to solve this problem, geometric tolerancing was introduced. In this example, to inform the machinist of the need for a straight shaft part, the geometric tolerance markings in Fig. 3 can be used.
Fig. 3: True straightness of the shaft surface
The true straightness marking in Figure 3 consists of a tolerance symbol and a tolerance value to inform the inspector that the difference between the highest and lowest point of the shaft surface must fall within two planes spaced 0.1 mm apart. And so on, if you want to ensure the flatness or perpendicularity of the part, there are also corresponding tolerance symbols and marking methods, which will be explained later.
Fit Tolerances
For mechanical design, two parts are often assembled, the most common being the shaft-hole fit, which can be differentiated into clearance fit and interference fit according to the use of the fit.
If the shaft and hole have relative movement, then the clearance between the shaft and hole must be ensured, and the fit between the two is the clearance fit; on the contrary, if the shaft part is fixed in the hole, it can be fixed by the compression between the shaft and hole, and the fit is the interference fit. The fit between the shaft and the hole depends in large part on the tolerance range of the two.
For example, if the tolerance of the hole is H7 and the tolerance of the shaft is g6, the fit is a clearance fit with a tolerance of H7g6, which is usually used for continuous rotation without shaking.
Figure 4: Shaft fitting tolerances
The tolerances of shaft parts with a diameter of 10 mm range from -0.005 to -0.0014, and the interested reader can consult the tolerance table in Reference 1. At this point you may wonder how not to write out the tolerance range directly, but also to engage a g6 symbol?
The first reason is that the clearance of this type of fit tolerance is usually about 0.001mm, so the figure will be more complicated when marked with numbers on the surface, and using symbols can increase the readability, but there is another saying that using symbols, the processor also has to consult the chart instead of inconvenience, so this part needs to communicate with the cooperation factory.
The second reason is that the use of symbols can effectively improve design efficiency. For example, to achieve precision rotation, the tolerance range required for a 10mm diameter shaft part is different from that required for a 100mm diameter shaft part.
The H7g6 fit is -0.005mm to -0.0014mm for a 10mm diameter shaft and -0.012mm to -0.034mm for a 100mm diameter shaft, regardless of the bore size used.
Common tolerance range of stainless steel plate
| 1. ASTM A240 A480 steel sheet’sthickness tolerance. |
| thcikness,in.[mm] |
Deviation, allowed for the specified width |
|
|
|
| (w),±,in.[mm] |
| w≤60[1525] |
w>60[1525] |
|
|
| 0.072[1.83] |
0.006[0.15] |
0.009[0.22] |
|
|
| >0.072[1.83]-0.083[2.11] |
0.007[0.18] |
0.010[0.25] |
|
|
| >0.083[2.11]-0.098[2.49] |
0.008[0.20] |
0.011[0.27] |
|
|
| >0.098[2.49]-0.114[2.90] |
0.009[0.23] |
0.012[0.30] |
|
|
| >0.114[2.90]-0.130[3.30] |
0.011[0.27] |
0.013[0.33] |
|
|
| >0.130[3.30]-0.145[3.68] |
0.012[0.30] |
0.013[0.33] |
|
|
| >0.145[3.68]-0.1875[4.76] |
0.013[0.33] |
0.014[0.35] |
|
|
| >0.1875[4.76]-0.250[6.35] |
-0.010[0.25],+0.020[0.50] |
-0.010[0.25],+0.020[0.50] |
|
|
| >0.250[6.35]-0.3125[7.94] |
-0.010[0.25],+0.022[0.55] |
-0.010[0.25],+0.022[0.55] |
|
|
| >0.3125[7.94] |
-0.010[0.25],+0.030[0.75] |
-0.010[0.25],+0.030[0.75] |
|
|
|
|
|
|
|
| 2. ASTM A480cold rolled sheet/plate thickness tolerance |
| thcikness ,in.[mm] |
Deviation, allowed for the specified width |
|
|
| (w),±,in.[mm] |
| W≤40[1000] |
40[1000]<w≤50[1300] |
50[1300]<w≤84[2100] |
|
| 0.012[0.30] |
0.001[0.030] |
– |
– |
|
| 0.016[0.40] |
0.0015[0.04] |
0.0015[0.04] |
– |
|
| 0.020[0.50] |
0.0015[0.04] |
0.0015[0.04] |
– |
|
| 0.024[0.60] |
0.002[0.05] |
0.002[0.05] |
– |
|
| 0.032[0.80] |
0.002[0.05] |
0.002[0.05] |
– |
|
| 0.040[1.00] |
0.0025[0.06] |
0.0025[0.06] |
0.003[0.08] |
|
| 0.047[1.20] |
0.003[0.08] |
0.003[0.08] |
0.003[0.08] |
|
| 0.059[1.50] |
0.003[0.08] |
0.003[0.08] |
0.004[0.10] |
|
| 0.079[2.00] |
0.004[0.10] |
0.004[0.10] |
0.0045[0.11] |
|
| 0.098[2.50] |
0.004[0.10] |
0.004[0.10] |
0.005[0.13] |
|
| 0.118[3.00] |
0.005[0.13] |
0.005[0.13] |
0.006[0.15] |
|
| 0.157[4.00] |
0.007[0.17] |
0.007[0.17] |
0.007[0.17] |
|
| 0.197[5.00] |
0.007[0.17] |
0.007[0.17] |
0.0075[0.19] |
|
| 0.236[6.00] |
0.007[0.17] |
0.008[0.20] |
0.009[0.23] |
|
| 0.3125[8.00] |
0.007[0.17] |
0.009[0.23] |
0.010[0.25] |
|
| 3. ASTMA480 hot rolld plate with greater width |
| thcikness (t),in.[mm] |
width(w),in.[mm] |
| w≤84[2134] |
84[2134]<w≤120[3048] |
120[3048]<w≤144[3658] |
w>144[3658] |
| thickness + C,in.[mm] |
| t<3/16[4.76] |
0.055[1.35] |
0.070[1.78] |
– |
– |
| 3/16[4.76]≤t<3/8[9.52] |
0.045[1.14] |
0.050[1.27] |
0.085[2.16] |
– |
| 3/8[9.52]≤t<3/4[19.05] |
0.055[1.40] |
0.060[1.52] |
0.085[2.16] |
0.090[2.29] |
| 3/4[19.05]≤t<1[25.40] |
0.060[1.52] |
0.065[1.65] |
0.085[2.16] |
0.100[2.54] |
| 1[25.40]≤t<2[50.80] |
0.070[1.78] |
0.075[1.90] |
0.095[2.41] |
0.115[2.92] |
| 2[50.80]≤t<3[76.20] |
0.125[3.20] |
0.150[3.80] |
0.175[4.45] |
0.200[5.08] |
| 3[76.20]≤t<4[101.6] |
0.150[3.81] |
0.160[4.06] |
0.200[5.08] |
0.225[5.72] |
| 4[101.6]≤t<6[152.4] |
0.180[4.57] |
0.200[5.08] |
0.335[8.50] |
0.355[9.02] |
| 6[152.4]≤t<8[203.2] |
0.235[6.00] |
0.255[6.48] |
0.355[9.02] |
0.435[11.0] |
| 8[203.2]≤t<10[254.0] |
0.315[8.00] |
0.335[8.50] |
0.435[11.0] |
0.550[14.0] |
Tolerance is the recognized permissible length or thickness deviation, because the actual thickness of stainless steel sheet raw material rolled out of the steel mill is often not up to the theoretical thickness, which gives rise to the tolerance. In the process of buying and selling stainless steel as well as the application, this is a very important term.
When we buy and sell stainless steel sheets, usually by theoretical thickness, which is why the theoretical price is lower than the price of weighing, in addition to weighing additional lifting and other costs.
Tolerances and size, generally have large tolerances, normal tolerances, small tolerances. Why must customers ask for stainless steel sheet tolerance? Tolerances are not the same, the price is not the same, relatively speaking, the price of large tolerances will be cheaper than small tolerances, the same material, the same thickness, the difference in tolerance may bring hundreds of dollars of price difference.
Source: China Stainless Steel Plates Manufacturer – Jiade Group Co., Limited (www.jiade-group.com)
